Way back when I started playing Vertigo 2, I had an issue where my controllers would turn off after only 1 minute. I fixed it back then by changing chargers and letting it sit overnight. Unfortunately, that was only a temp fix. Fast forward to this month and nothing kept my controllers running. I finally broke down, finally replacing Valve Index Controller batteries.
Now I wanted to share what I tried first, then how I went about successfully completing the replacement.
Valve Index Controller Battery Fixes I Tried First
The problem I had was a common one I found online, but the easy “fixes” did not work for me this time. I tried resetting the Index Controllers per Valve’s instructions, but no luck. I even tried what worked for me last time. Switched to a known good USB C fast charger, then let it charge overnight.
None of those easy fixes worked for me. I even tried using a battery pack to see if the issue was tracking related (forcing the controller to sleep) or USB related. Plugging them into the power bank I had laying around confirmed my battery was the issue.
I remembered back when I ran into the similar problem trying to play Vertigo 2 that there was a replacement battery available, so I found info about it and got to work.
Replacing Valve Index Controller Batteries

The first Youtube video I found outlined how to disassemble the controller to get the older battery out. I browsed the video where he mentioned “you could die” a couple of times, so I checked for replacement controllers, instead. Unfortunately, they were all sold out. Not like I really wanted to spend $300 on new ones anyways.
I went back to the video and realized it’s not so bad, as long as I’m patient and careful. It has great info on how to open up the controller, but it mentions soldering a new battery on. That’s where I remembered reading about a replacement battery with no soldering required. Lucky for me, that original video page included a link to the follow up video about that exact XINJ battery.
Now with instructions to use and a replacement battery link, I ordered the battery, actually two. Although only my right controller had the issue originally, I knew the left was not far behind. Spoiler alert, the left one started doing the same thing a week after the right one. Do yourself a favor and order two batteries.
There are 2 downsides to replacing Valve Index Controller batteries with XINJ ones. The size is a bit smaller, so they don’t last quite as long as the originals. Still, that’s better than nothing. The other thing is it takes weeks for delivery. I’m guessing it came over on a boat. It didn’t take quite as long as the website estimated, but it wasn’t exactly Amazon quick.
Prepping for Replacing Valve Index Controller Batteries
I did take some of that delivery wait time to order a good LED lamp and mirror combo. It is definitely very useful to have reliable light so I can work on stuff like this at my dark desk. Having a magnifying glass to see more detail was helpful, and also nice to have a barrier in case the battery explodes.
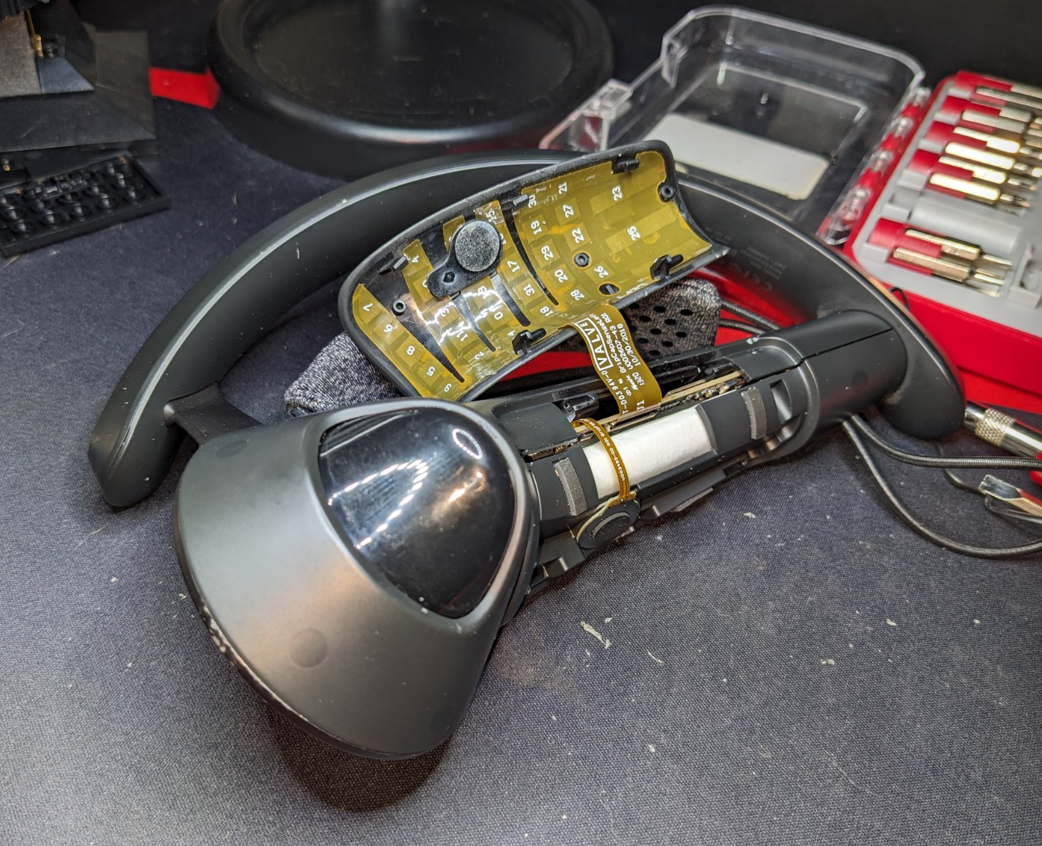
Once the batteries arrived, I followed the instructions in the first video to disassemble the controller and ran into the same snag as the video creator. The deeply set Torx 5 screw hole was too narrow for the screwdriver kit I had around. When he suggests ordering special thin version of Torx 5, do it.
I didn’t follow that advice, even though I had weeks to order one before the battery came. That screw hole added at least an hour to my disassemble time, as a result. I had to carefully use my drill to bore a larger hole like he did, then still struggle to find a good grip to loosen the screw.

At points, I thought I stripped that tiny screw. After all the effort and near disaster, it was so exciting when I felt the Torx head turn that tiny screw, finally.
With all the screws lose, the next stressful step replacing Valve Index Controller batteries was removal. The video mentions not accidentally poking the battery because you could die. Lithium batteries are definitely dangerous, so I found a pair of tweezer with a plastic back wedge. It was a perfect, safe way to pry the old battery from the controller glue. I highly recommend a plastic wedge with no sharp edges. Don’t blow yourself up!
Onto Swapping out the Batteries
Once I freed the battery from the glue, I moved onto video # 2 to disconnect the old battery and install the new. I used my same set of tweezers to pick away at the glue on top of the battery connector. The connectors I’ve dealt with in the past plug into the side, but this one clips straight down. Took me a bit too long before I realized I had to pull directly up on the connector to pry it off.
With the old battery fully removed, I followed the instructions to peel off the wrapper on the old battery to reuse with the new one. The plastic back of my tweezers was perfect to get under that wrapper without poking the battery. After that wrapper, swapping out was easy.

Scared me a bit how bloated the old battery is compared to the new one. The smaller, newer battery was much easier to fit into place. It took me a bit to get the correct alignment to click the battery connector into position, but seemed secure. I did follow the video creator’s advise and put strong tape overtop to better secure. I do not want to go through all this again due to a lose connection.
Testing for Success
With all that replacing Valve Index Controller batteries mess behind me, I hit that moment of truth. I turned the controller on and success! After all those stressful moments, seeing that power light was a nice bit of victory. I followed instructions to put everything back together, then tested power again and still good.
I tested out the controller in VR for an hour (after fully charging it) and it is good to go. I did notice after that first full charge it only showed 3 out of 4 charge lights in SteamVR, but that’s likely due to the smaller battery capacity. Regardless, it works and I’m so happy the whole order was less than $50.
It’s a bit nerve racking, but I highly recommend this battery swap for anyone out of warranty and that does not want to spend $300 plus for new controllers.